Welogic server Side by side deployment
Keywords : weblogic side by side deployment, side by side deployment in weblogic, deployment, weblogic deployment
Weblogic Server supports a nice feature called side-by-side deployment (or versioned deployment). This function is extremely usefull when you need to deploy a new version of an application and still keep the old one up and running. So the running instances will still use the current version and all new instances will be able to invoke the new deployed version of the application.
As soon as all the sessions who’re using the old version of the application are expired, Weblogic will recognize it and will deactivate the old version. So at this moment only the new deployed version is active and all new sessions will make us of it.
So how does this work ?
**********************************
[A].1 -> From command line
*********************************
Deploy a web application version 1 with below command ( i am deploying on Admin server )
java weblogic.Deployer -adminurl t3://localhost:7001 -username weblogic -password webl0gic -name VersionedApp -targets AdminServer -deploy -source C:\shoppingcart.war -appversion version1
you will see application deployed with as version1.
Now redeploy the application as version 2 with below commands
java weblogic.Deployer -adminurl t3://localhost:7001 -username weblogic -password webl0gic -name VersionedApp -targets AdminServer -redeploy -source C:\shoppingcart.war -appversion version2
you will see same application deployed with as version2.
go ahead and delete the old application with status as retired.
************************
[B].1 From Console
************************
Edit to manifest file located in META-INF and add the next on a new row : ‘WebLogic-Application-Version: v1′
Keywords : weblogic side by side deployment, side by side deployment in weblogic, deployment, weblogic deployment
Weblogic Server supports a nice feature called side-by-side deployment (or versioned deployment). This function is extremely usefull when you need to deploy a new version of an application and still keep the old one up and running. So the running instances will still use the current version and all new instances will be able to invoke the new deployed version of the application.
As soon as all the sessions who’re using the old version of the application are expired, Weblogic will recognize it and will deactivate the old version. So at this moment only the new deployed version is active and all new sessions will make us of it.
So how does this work ?
[A].1 . You could either use command line to deploy the application and specify the versionnumber on deployment as one of
the parameters
[B].1. you can use the manifest.mf file and deploy from console
**********************************
[A].1 -> From command line
*********************************
Deploy a web application version 1 with below command ( i am deploying on Admin server )
java weblogic.Deployer -adminurl t3://localhost:7001 -username weblogic -password webl0gic -name VersionedApp -targets AdminServer -deploy -source C:\shoppingcart.war -appversion version1
you will see application deployed with as version1.
Now redeploy the application as version 2 with below commands
java weblogic.Deployer -adminurl t3://localhost:7001 -username weblogic -password webl0gic -name VersionedApp -targets AdminServer -redeploy -source C:\shoppingcart.war -appversion version2
you will see same application deployed with as version2.
go ahead and delete the old application with status as retired.
************************
[B].1 From Console
************************
Edit to manifest file located in META-INF and add the next on a new row : ‘WebLogic-Application-Version: v1′
Package the service and deploy it in the console
Deployment
- Go to the Weblogic Console > Deployments. Click ‘Lock & Edit’ and in the deployments part click Install
- Select the just created archive

- Install this deployment as an application
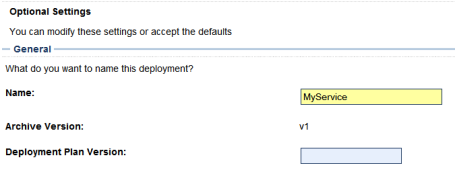
- Optional Settings. And in here we will see the ‘Archive Version’ of our application. Change the name to ‘MyService’ and leave the rest on default value

If you look in the list of deployments we will see our application is labeled with a version indication (v1).
The current version is still active.
The current version is still active.
Now create a new version of the application and change the v1 in the manifest file to v2, and package it.
Update Deployment
- Go to the Weblogic Console > Deployments. Click ‘Lock & Edit’, select the application we want to update (MyService) and in the deployments part click Update
- Click Change Path of the source path and select the just created archive (v2), the application will be deployed as version v2
If we now look in the list of deployments, we will see 2 versions of our application deployed.
Version v1 gets status ‘Retired’ and the new version v2 will get status ‘Active’.


The details in this section are very informative and easy to follow.Thanks for the blog.
ReplyDelete